
Classic Pastry Scones are the epitome of comfort—crisp on the outside and soft on the inside, they make every occasion feel special. Whether you’re planning a traditional afternoon tea or a cozy brunch, these flaky treats are sure to impress. In this step-by-step guide, we’ll teach you how to make Classic Pastry Scones that are perfectly light, tender, and golden brown every time. You’ll learn the importance of selecting the right ingredients, mastering the mixing technique, and baking them to perfection. Plus, we’ll share expert tips and tricks to elevate your scone game. Ready to create the perfect scones and wow your guests? Keep reading—we’ve got all the essential info ahead!
Table of Contents
The Timeless Appeal of Classic Pastry Scones
A brief history of scones and their origins
The origins of Classic Pastry Scones trace back to Scotland in the early 16th century. Initially, they were made with oats and baked on a griddle, rather than in an oven, making them quite different from the buttery versions we know today. As time passed, the recipe evolved, and by the 19th century, the inclusion of wheat flour, butter, and a touch of sweetness became commonplace. The rise of baking powder in the Victorian era also transformed the texture, giving Classic Pastry Scones their light and airy consistency. Today, they are a beloved staple of British cuisine, often served with clotted cream and jam, especially during afternoon tea.
Why classic pastry scones remain a favorite worldwide
Classic Pastry Scones have endured as a global favorite due to their versatility and comforting nature. Their delicate balance of flakiness and tenderness appeals to diverse palates, while their ability to pair seamlessly with a variety of toppings—ranging from clotted cream to fresh fruits—adds to their universal appeal. These scones evoke nostalgia and tradition, often associated with leisurely afternoon teas or family gatherings. The simple, yet refined recipe offers a canvas for creative twists, allowing them to remain relevant across cultures and generations. The timelessness of Classic Pastry Scones ensures they continue to capture hearts and taste buds worldwide.
The versatility of scones for various occasions
The versatility of Classic Pastry Scones makes them a go-to treat for a wide range of occasions. Whether served at a formal afternoon tea, paired with coffee for a casual brunch, or offered as a comforting snack, their adaptability shines. These scones can be flavored with an array of ingredients, such as dried fruits, nuts, or even savory herbs, catering to diverse tastes and dietary preferences. Their ability to seamlessly complement both sweet and savory fillings ensures that Classic Pastry Scones are perfect for everything from intimate gatherings to celebratory events, making them a beloved choice for any moment.
Essential Ingredients for Perfect Scones
Flour: Choosing the right type for texture
When making Classic Pastry Scones, choosing the right type of flour is crucial for achieving the perfect texture. All-purpose flour is a common choice, offering a good balance of structure and tenderness. However, for a lighter, more delicate crumb, cake flour is an excellent alternative. Its lower protein content results in a softer, airier scone. For those seeking a heartier scone, whole wheat flour can be incorporated, adding depth and a slightly nutty flavor. The right flour not only influences the scone’s texture but also ensures that the finished product is light, flaky, and irresistibly moist—hallmarks of Classic Pastry Scones.
Butter: The secret to achieving a flaky, tender scone
Butter is the secret ingredient that transforms Classic Pastry Scones from ordinary to extraordinary. Its high-fat content is key to achieving the desired flakiness and tenderness. When incorporated into the dough, cold butter creates small pockets that expand during baking, resulting in a light, airy texture. For the best results, it’s crucial to handle the butter minimally, ensuring it remains in small, solid chunks within the dough. This technique prevents overmixing, which can lead to dense scones. Using high-quality, unsalted butter allows for better control over the flavor, making it an essential element for perfect Classic Pastry Scones.
Sugar: Balancing sweetness without overpowering the flavor
Sugar plays a subtle yet vital role in creating the perfect balance of flavor in Classic Pastry Scones. While it adds a hint of sweetness, it should never overpower the delicate, buttery taste. A light touch is key—too much sugar can mask the rich texture of the scone and make it overly sweet. Typically, a modest amount of granulated sugar is used in the dough, while a sprinkling of coarse sugar on top gives the scones a delightful crunch and a golden finish. This careful balance ensures that the sweetness enhances, rather than dominates, the overall flavor of Classic Pastry Scones.
Baking powder: How it helps achieve a light, airy texture
Baking powder is the essential leavening agent that ensures Classic Pastry Scones achieve their signature light, airy texture. It works by releasing carbon dioxide gas when mixed with liquid and exposed to heat, causing the dough to rise. The key is to use the right amount; too little will result in dense scones, while too much can cause them to rise too quickly and then collapse. For a perfectly balanced scone, it’s important to incorporate baking powder evenly throughout the dry ingredients. This results in scones that are not only tender but also beautifully puffed, with a melt-in-your-mouth crumb.
Milk or cream: The key to moisture and richness
Milk or cream is crucial for adding both moisture and richness to Classic Pastry Scones. The liquid helps bind the dry ingredients, ensuring the dough comes together smoothly. While milk creates a softer, more delicate scone, cream imparts a richer texture and deeper flavor, making the scones even more indulgent. The fat content in cream enhances the scones’ tenderness, resulting in a melt-in-your-mouth experience. When using milk, opting for whole milk will provide the best balance of moisture without compromising the scone’s lightness. Both options are key to achieving the perfect, luxurious crumb in Classic Pastry Scones.
Optional flavorings: Adding variety with fruits, spices, or extracts
Optional flavorings offer endless possibilities for customizing Classic Pastry Scones, allowing for delightful variations. Adding dried fruits like raisins, currants, or cranberries infuses a touch of sweetness and chewiness. For a fragrant twist, spices such as cinnamon, nutmeg, or cardamom can be incorporated to create a warm, aromatic profile. A few drops of vanilla or almond extract can elevate the scone’s flavor without overwhelming its delicate balance. These optional additions not only enhance taste but also provide a visual appeal, making each batch of Classic Pastry Scones uniquely yours, suited to any occasion or personal preference.
Step-by-Step Process to Make Classic Pastry Scones
Preparing your kitchen and tools for baking
Preparing your kitchen and tools is essential for crafting perfect Classic Pastry Scones. Start by ensuring your workspace is clean and clutter-free, allowing for easy movement and access to ingredients. Gather all necessary tools, such as a mixing bowl, a pastry cutter, or two knives for cutting in the butter, and a baking sheet lined with parchment paper. Preheat your oven to the appropriate temperature to ensure even baking. It’s also helpful to have measuring spoons and cups on hand for precision, as even a slight variation can affect the final texture of your Classic Pastry Scones. Preparation is key to a flawless bake.
Sifting the dry ingredients for a smooth batter
Sifting the dry ingredients is a crucial step in making Classic Pastry Scones. This process helps aerate the flour, ensuring a lighter, fluffier texture in the final product. By removing any lumps and distributing the baking powder evenly, sifting creates a smooth, consistent batter. It also helps to prevent clumping, ensuring that all dry ingredients—like flour, sugar, and salt—are properly incorporated. This step not only contributes to the perfect crumb but also ensures that the scones rise evenly during baking, resulting in golden, tender Classic Pastry Scones that melt in your mouth.
Cutting in the butter for that perfect flaky texture
Cutting in the butter is a vital technique for achieving the perfect flaky texture in Classic Pastry Scones. The goal is to incorporate cold butter into the dry ingredients without fully blending them. Using a pastry cutter or two knives, the butter is broken into small, pea-sized pieces, creating pockets of fat that will melt during baking. This process ensures the scones develop a tender, airy crumb with a slight crispness on the outside. Properly cutting in the butter is the secret to that melt-in-your-mouth flakiness that makes Classic Pastry Scones irresistible and wonderfully light.
Mixing the dough: How to avoid overworking it
When mixing the dough for Classic Pastry Scones, it’s essential to avoid overworking it. Overmixing can lead to tough, dense scones, rather than the light and airy texture you desire. To prevent this, gently stir the ingredients together using a fork or your hands until just combined. The dough should still have some lumps of butter visible—this is crucial for creating the flakiness that defines Classic Pastry Scones. The goal is to handle the dough as little as possible, ensuring that the fat remains intact to create delicate layers. Less is more when it comes to mixing for perfect scones.
The importance of using cold ingredients
The importance of using cold ingredients cannot be overstated when making Classic Pastry Scones. Cold butter, in particular, is essential for achieving that signature flaky texture. When mixed into the dough, the cold butter creates small pockets of fat that melt during baking, leading to a light, tender scone. Likewise, using cold milk or cream helps maintain the dough’s integrity and prevents it from becoming too sticky. Keeping ingredients cold also reduces the risk of overworking the dough, ensuring that Classic Pastry Scones remain delicate and airy, rather than tough or dense. Temperature control is a key factor in their success.
Shaping the scones: Techniques for even baking
Shaping the dough properly is crucial for ensuring even baking in Classic Pastry Scones. After mixing the dough, gently pat it into a thick round disc on a floured surface. Be careful not to overwork the dough, as this may result in heavy scones. Using a sharp knife or a round cutter, cut the dough into uniform shapes, ensuring each piece is evenly spaced on the baking sheet. This allows the scones to bake consistently, ensuring that they rise beautifully and have an even golden color. Proper shaping helps achieve that perfectly fluffy, tender crumb characteristic of Classic Pastry Scones.
Classic Pastry Scones
Equipment
- Large mixing bowl
- Whisk
- Grater or pastry cutter
- Parchment paper
- Baking sheet
- Wire rack
Ingredients
- 2 cups all-purpose flour
- ⅓ cup granulated sugar
- ¼ teaspoon baking soda
- 2 teaspoons baking powder
- ½ teaspoon salt
- ½ cup frozen unsalted butter
- ⅓ cup plain Greek yogurt
- ⅓ cup heavy whipping cream
- 1 large egg
- 1 teaspoon vanilla extract
- 1 cup favorite mix-ins e.g., Craisins, blueberries, chocolate chips
- 1 cup powdered sugar
- 1 –2 tablespoons milk
Instructions
- Preheat oven to 400°F (200°C) and line a baking sheet with parchment paper.
- In a large bowl, whisk together flour, sugar, baking soda, baking powder, and salt.
- Grate frozen butter into the dry ingredients and mix until coarse crumbs form.
- In a separate bowl, whisk together Greek yogurt, cream, egg, and vanilla extract.
- Gradually add wet ingredients to the dry mixture, folding gently. Add mix-ins.
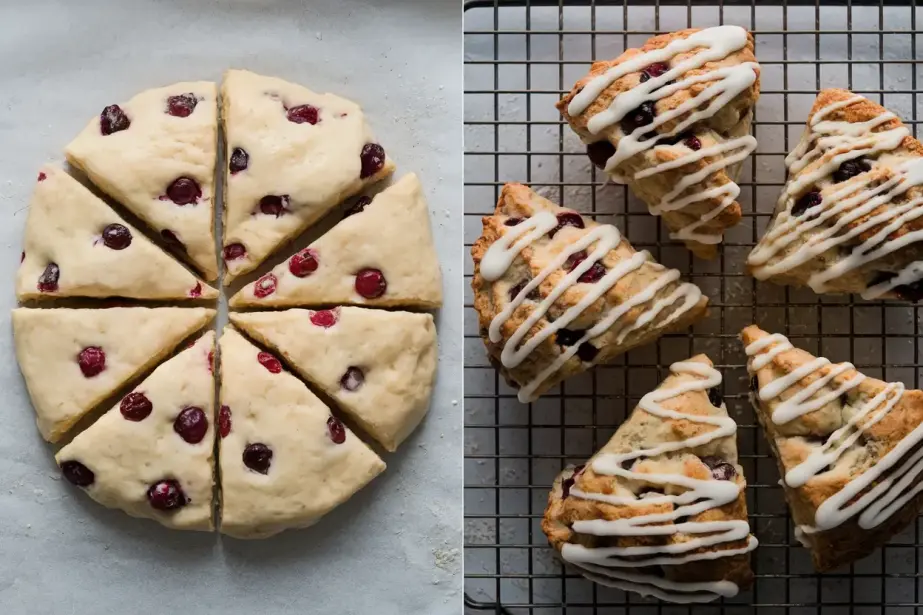
- Turn dough onto a floured surface, knead gently, shape into an 8-inch circle, and cut into 8 wedges.
- Arrange wedges on the baking sheet and bake for 16–18 minutes until golden brown.
- Let cool on a wire rack for 10 minutes.
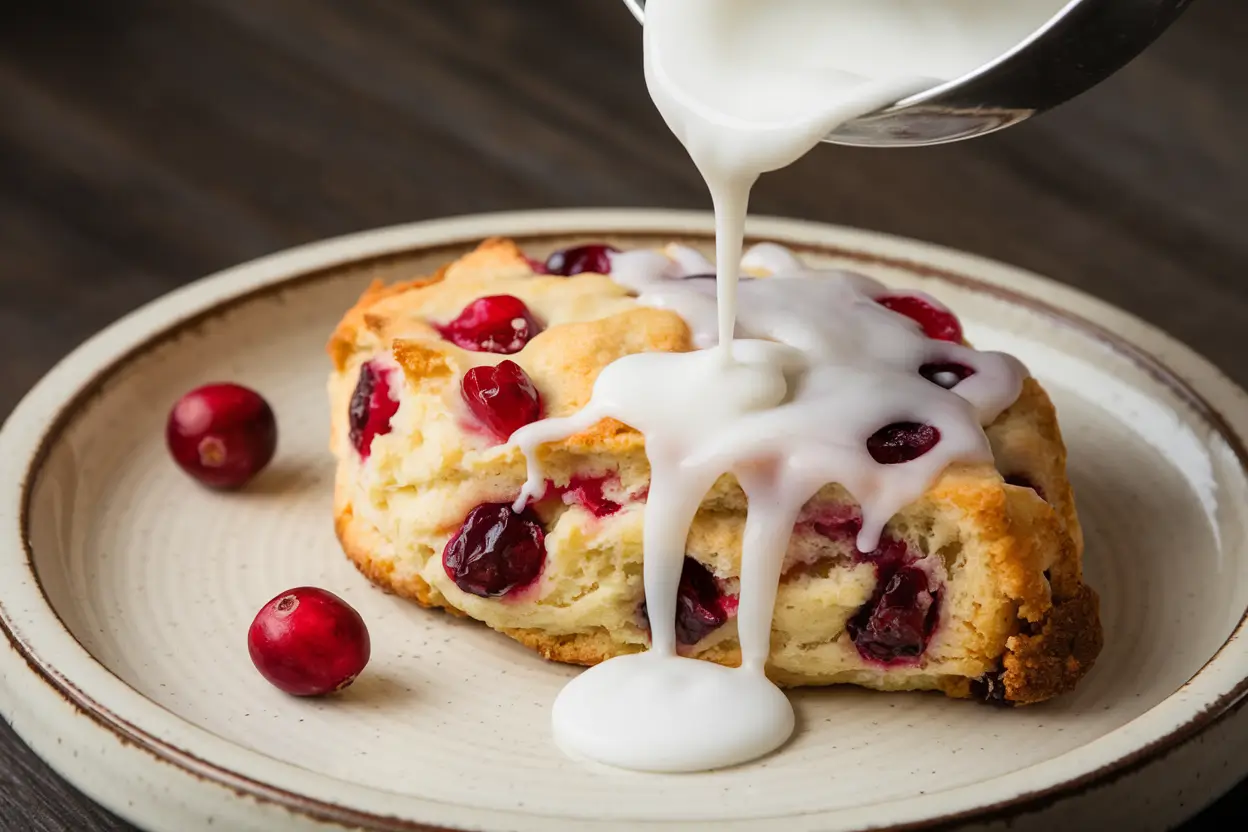
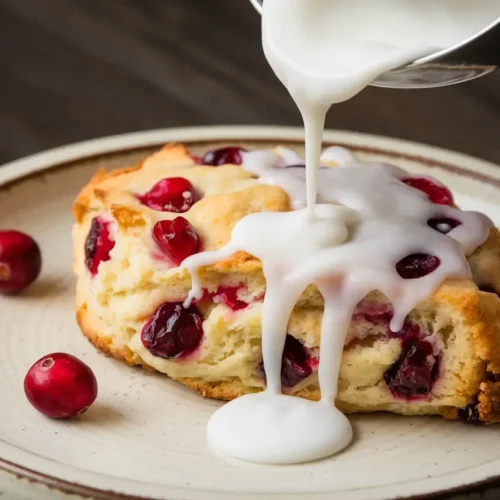
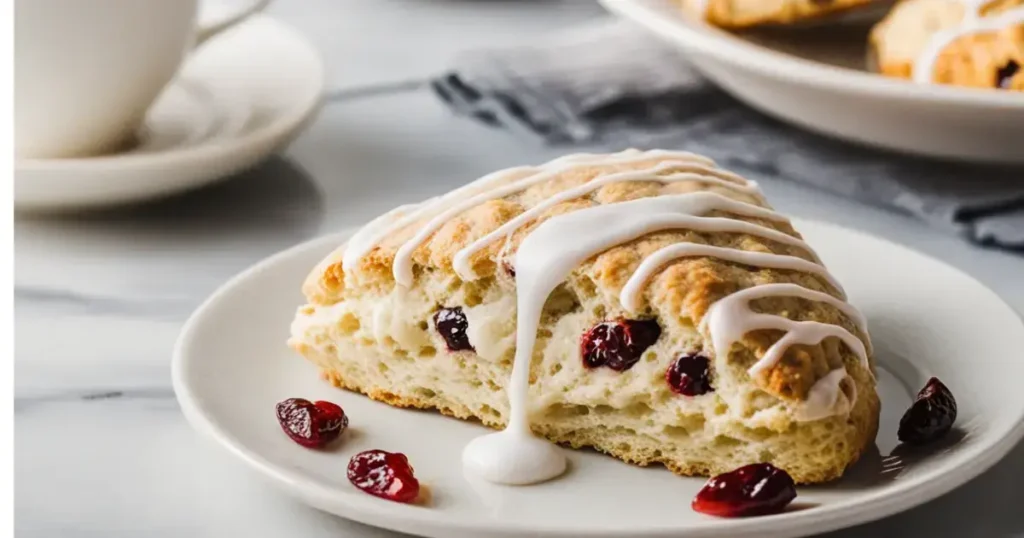
- Prepare glaze by combining powdered sugar and milk, then drizzle over cooled scones.
Notes
- Use frozen butter to ensure a flaky texture.
- Mix gently to avoid tough scones.
- Customize with sweet or savory mix-ins.
RELATED RECIPES
Italian Panna Cotta with Salted Caramel
Protein Cookies: the Ultimate Healthy Dessert
Apple Crisp Bars: The Ultimate Fall Dessert with Shortbread Crust & Crumble Topping
The Art of Baking: Temperature and Time for the Perfect Scone
Preheating the oven and preparing your baking sheet
Preheating the oven is a critical step when baking Classic Pastry Scones. Ensuring the oven reaches the correct temperature before placing the scones inside allows them to rise evenly and achieve that golden, flaky exterior. Set the oven to the recommended temperature and allow it to fully heat. Simultaneously, prepare your baking sheet by lining it with parchment paper or lightly greasing it to prevent sticking. The right preparation ensures the scones bake uniformly, maintaining their delicate texture. A preheated oven and properly prepared baking sheet set the stage for the perfect batch of Classic Pastry Scones.
The role of baking temperature in achieving golden-brown scones
Baking temperature plays a pivotal role in achieving golden-brown Classic Pastry Scones. An oven that is too cool will result in undercooked, pale scones, while a temperature that is too high may cause the scones to brown unevenly. The ideal temperature allows the scones to rise steadily, forming a crisp, golden exterior while maintaining a tender, moist interior. Typically, baking at 400°F to 425°F (200°C to 220°C) ensures that the scones develop a beautiful, even color and a perfect crumb. Precision in temperature control is the key to getting that irresistible golden-brown finish on Classic Pastry Scones.
How long should you bake your scones for the best results?
For the best results when baking Classic Pastry Scones, aim for a baking time of 12 to 15 minutes. This duration allows the scones to rise to perfection, developing a golden-brown crust while ensuring a soft, flaky interior. The exact time may vary slightly depending on the size of the scones and your oven’s efficiency. It’s essential to keep an eye on them toward the end of the baking process, as overbaking can lead to dry scones. Once the tops are lightly browned and a toothpick inserted comes out clean, your Classic Pastry Scones are ready to enjoy.
Signs to look for when the scones are ready
To determine when Classic Pastry Scones are ready, look for a few key signs. First, the tops should be golden brown and slightly firm to the touch. Gently tap the side of a scone; it should sound hollow, indicating it has fully risen and cooked through. Additionally, a toothpick inserted into the center should come out clean, without any raw dough sticking. The edges of the scones should also be slightly crisp. If you notice these visual and tactile cues, your Classic Pastry Scones are likely baked to perfection, ready to be enjoyed fresh from the oven.
Tips and Tricks for Perfect Classic Pastry Scones Every Time
How to achieve a light and tender texture every time
To achieve a light and tender texture in Classic Pastry Scones, it’s crucial to follow a few key principles. First, use cold butter and handle the dough gently to maintain the fat’s integrity. Avoid overmixing the dough, as this can lead to a dense scone. Sifting the dry ingredients helps create a smoother, lighter batter, while a high baking temperature encourages proper rising. Additionally, using the right ratio of liquids ensures the dough stays moist but not overly sticky. With these techniques, you’ll consistently bake Classic Pastry Scones that are irresistibly soft, flaky, and perfectly tender.
Troubleshooting common issues like dense or dry scones
When making Classic Pastry Scones, encountering dense or dry scones is a common issue, but it can be easily prevented. Dense scones often result from overmixing the dough, which develops gluten and leads to a tough texture. To prevent this, stir the ingredients only until they are fully incorporated. Dry scones may stem from using too much flour or not enough liquid. To fix this, ensure accurate measurements and use cold liquids to maintain the right moisture balance. Additionally, always handle the dough gently and avoid overbaking, which can dry out the scones. By following these tips, your Classic Pastry Scones will always turn out light and tender.
Making scones ahead of time and storing them properly
Making Classic Pastry Scones ahead of time is a great way to save time without sacrificing freshness. After preparing the dough, shape the scones and freeze them before baking. This ensures they retain their flaky texture once baked. When ready to bake, simply place the frozen scones directly on a baking sheet and increase the baking time slightly. For storing baked scones, allow them to cool completely before placing them in an airtight container. Keep them at room temperature for up to two days, or freeze them for longer storage. Proper storage maintains the delightful texture of Classic Pastry Scones.
Customizing your scone recipe with fun flavor variations
Customizing your Classic Pastry Scones with unique flavor variations is a wonderful way to add a personal touch. Consider infusing the dough with fresh ingredients like zest from citrus fruits, or fold in dried fruits such as currants, cranberries, or raisins for added sweetness. For a savory twist, add herbs like rosemary or cheddar for a rich, aromatic experience. Spices like cinnamon or nutmeg can elevate the flavor, making your scones perfect for any season. These simple tweaks will take your Classic Pastry Scones from traditional to extraordinary, making them stand out at any gathering or occasion.
Serving and Enjoying Classic Pastry Scones
Classic toppings: Clotted cream, jam, and fresh fruit
The true charm of Classic Pastry Scones lies in their delightful toppings. Traditional clotted cream, with its rich, velvety texture, pairs perfectly with the light, airy scones, creating a luxurious mouthfeel. Add a dollop of fruit jam—strawberry, raspberry, or even apricot—to introduce a sweet contrast to the cream’s richness. For an added burst of freshness, top with seasonal fresh fruit such as berries or slices of ripe peaches. These classic toppings elevate the Classic Pastry Scones, turning them into a sophisticated treat that’s perfect for afternoon tea or any indulgent occasion.
Pairing scones with tea: A British tradition
Pairing Classic Pastry Scones with tea is a time-honored British tradition that embodies elegance and relaxation. The rich, buttery texture of the scones complements the warmth and subtle flavors of a good tea. Traditionally, a robust black tea like Earl Grey or Darjeeling is chosen, as its bold notes balance perfectly with the sweetness of the scones. The ritual of enjoying tea and scones often served with clotted cream and jam, creates a refined yet comforting experience. This delightful combination has been cherished for centuries, making it the quintessential treat for afternoon tea or any special occasion.
How to serve scones for breakfast, brunch, or afternoon tea
Classic Pastry Scones are versatile enough to shine at any time of day. For a delightful breakfast or brunch, serve them warm with a selection of spreads such as butter, honey, or fresh fruit preserves. If preparing for afternoon tea, offer them alongside clotted cream and jam, allowing guests to enjoy the traditional British combination. Garnishing with fresh berries or a dusting of powdered sugar can elevate the experience. Whether paired with coffee or tea, Classic Pastry Scones create a memorable, sophisticated touch that adds a layer of luxury to any meal, making them ideal for both casual and formal gatherings.
Creative ways to enjoy scones with different beverages
There are countless creative ways to enjoy Classic Pastry Scones beyond the traditional tea pairing. For a refreshing twist, serve them with chilled iced tea, offering a delightful contrast to the warmth of the scones. For a more indulgent experience, try pairing with a rich, velvety hot chocolate. The sweetness of the scones enhances the deep flavors of the chocolate, creating a luxurious treat. Alternatively, complement your scones with freshly brewed coffee or a cappuccino, where the slight bitterness balances the scones’ buttery richness. With endless possibilities, Classic Pastry Scones can be the perfect match for any beverage, elevating your experience.
Frequently Asked Questions
What are the key tips for baking perfect scones?
The key to perfect scones lies in using cold ingredients, handling the dough gently to avoid overworking it and baking at the right temperature (400°F–425°F or 200°C–220°C). Cold butter creates flakiness, while minimal mixing ensures a tender crumb. Proper shaping and even baking also contribute to a golden, airy finish.
What ingredients were used in the earliest scone recipes?
The earliest scones were made with simple, rustic ingredients like oats and baked on a griddle. They lacked the butter and sugar found in modern recipes, relying instead on basic staples. Over time, wheat flour, baking powder, and butter were introduced, transforming them into the tender, flaky scones we know today.
What makes scones different from biscuits in terms of ingredients?
Scones typically include sugar and sometimes eggs, giving them a slightly sweeter and richer flavor compared to biscuits. Biscuits rely on buttermilk or milk for moisture and often have a flakier, more layered texture. Additionally, scones may incorporate fruits, spices, or extracts, while biscuits are usually savory.
Why is a knife or pastry cutter used when making scone dough?
A knife or pastry cutter is used to incorporate cold butter into the flour without overmixing. This technique creates small pockets of fat that melt during baking, resulting in a flaky, tender texture. It ensures the butter remains in small chunks, which is essential for achieving the perfect scone consistency.
How do British scones differ from their American counterparts?
British scones are typically less sweet and plainer, designed to be paired with clotted cream and jam. American scones are often sweeter, denser, and loaded with mix-ins like fruits, nuts, or chocolate. The texture of British scones is lighter and more crumbly, while American scones tend to be richer and more cake-like.
What’s the traditional way to enjoy scones in Cornwall?
In Cornwall, scones are traditionally served as part of a cream tea, split in half, and topped with clotted cream and strawberry jam. The Cornish method involves spreading the cream first, followed by the jam. This indulgent combination highlights the simplicity and elegance of the scone.
How are scones traditionally served in British royal tea settings?
In British royal tea settings, scones are served warm, accompanied by clotted cream, jam, and a selection of fine teas. They are often presented on tiered stands alongside other pastries and finger sandwiches. The presentation emphasizes elegance and tradition, reflecting the refined nature of afternoon tea.
Conclusion: Mastering the Art of Classic Pastry Scones
In conclusion, mastering the art of Classic Pastry Scones is a rewarding experience that combines technique and creativity. Remember the key steps: choosing the right ingredients, working the dough gently, and baking at the perfect temperature. Don’t hesitate to experiment with different flavor variations to make your scones uniquely yours. Add fruits, spices, or extracts to personalize each batch. The true joy of baking Classic Pastry Scones lies in sharing them with family and friends. Whether it’s for breakfast, brunch, or afternoon tea, your homemade scones will become a cherished treat that brings loved ones together and creates lasting memories. Enjoy every delicious bite!
1 thought on “Classic Pastry Scones”