
Reese’s Peanut Butter Banana Bread is my idea of pure comfort in loaf form. I love how it takes classic, cozy banana bread and turns it into a rich, candy‑bar inspired treat by adding creamy peanut butter and plenty of chocolate. Each slice is super moist, packed with banana flavor, swirls of peanut butter, and melty chocolate pockets that make it feel like dessert and breakfast all at once.
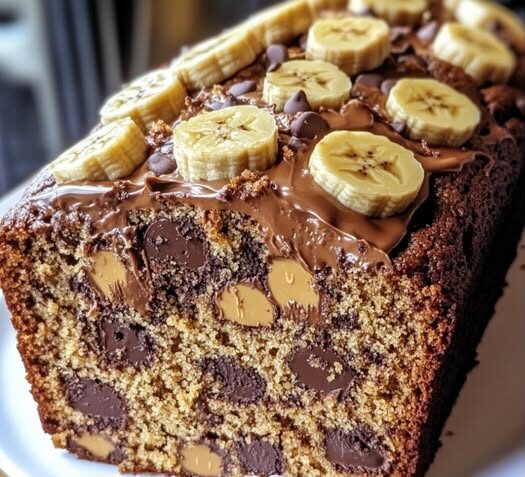
This is the kind of banana bread I reach for when I have ripe bananas on the counter and I’m craving something a little extra. The peanut butter adds protein and a satisfying richness, while the chocolate (especially if you use chopped Reese’s or peanut butter chips) gives that unmistakable Reese’s vibe. It’s perfect for sharing, gifting, or enjoying with coffee, and it looks beautiful topped with banana slices and drizzled chocolate just like in the photo.
Why I Love This Reese’s Peanut Butter Banana Bread
A fun twist on classic banana bread
Traditional banana bread is already a favorite in my kitchen, but adding peanut butter takes things to the next level. The combination of mashed ripe bananas and creamy peanut butter creates a dense yet tender crumb that stays moist for days. It has that nostalgic banana bread flavor with a deep, nutty note that reminds me of a Reese’s cup baked right into the loaf.
The batter is simple to mix by hand, so I don’t even need to pull out a mixer. Using melted butter means everything comes together easily, and the peanut butter blends right into the bananas and sugar without fuss. Once the chocolate goes in—whether it’s chocolate chips, chopped chocolate, or Reese’s pieces—the whole loaf turns into a swirl of peanut butter‑banana goodness with little chocolatey surprises in every bite.
Perfect for ripe bananas and easy gifting
Anytime I spot a few bananas getting spotty on the counter, this recipe becomes an instant option. Instead of plain banana bread, I can turn those bananas into something that feels special enough for a brunch table, potluck, or homemade gift. A wrapped loaf of Reese’s Peanut Butter Banana Bread feels like a thoughtful treat, especially for peanut butter and chocolate lovers.
Because the loaf slices cleanly once it’s fully cooled, it’s also great for packing into lunchboxes, taking to work, or freezing for later. I love knowing that a single batch can cover breakfast, snacks, and dessert for a couple of days with very little extra effort.
Ingredients for Reese’s Peanut Butter Banana Bread
For the banana bread batter
- 3 ripe bananas, mashed (the spottier, the better for sweetness and flavor)
- ½ cup creamy peanut butter
- ⅓ cup unsalted butter, melted and slightly cooled
- ½ cup granulated sugar
From here, you would typically add:
- 2 large eggs
- 1 teaspoon vanilla extract
- 1 ½ cups all‑purpose flour
- 1 teaspoon baking soda
- ½ teaspoon salt
These dry ingredients give the bread structure and help it rise while staying tender. The vanilla rounds out the flavor, and the eggs bind everything together for a smooth, cohesive batter.
For the Reese’s style add‑ins and topping
- 1–1 ½ cups chocolate chips, chopped chocolate, or a mix of chocolate and peanut butter chips
- Optional: extra peanut butter to drizzle on top
- Optional: banana slices for decorating the top before baking
Using both chocolate and peanut butter chips really emphasizes that Reese’s feeling. You can go heavy on the chocolate for a more dessert‑like loaf or keep things moderate for a breakfast‑friendly version.
How to Make Reese’s Peanut Butter Banana Bread
Preparing the pan and mixing the wet ingredients
I start by preheating the oven to 350°F (175°C) and greasing a standard 9×5‑inch loaf pan or lining it with parchment paper for easier removal. Then I mash the bananas in a large mixing bowl until mostly smooth, leaving a few small lumps for texture.
Next, I whisk in the creamy peanut butter, melted unsalted butter, and granulated sugar until everything is well combined. This mixture should look thick, glossy, and smell intensely of bananas and peanuts. At this stage, I add the eggs one at a time, whisking until smooth, then stir in the vanilla extract. The goal is a unified, silky base before adding any dry ingredients.
Adding dry ingredients and folding in chocolate
In a separate bowl, I whisk together the flour, baking soda, and salt. Then I gently fold the dry mixture into the wet ingredients, stirring just until no streaks of flour remain. Overmixing can make banana bread tough, so I stop as soon as the batter is mostly smooth.
Once the batter comes together, I sprinkle in the chocolate chips or chopped chocolate and, if I’m using them, some peanut butter chips or chopped Reese’s candies. I fold them through so they’re evenly distributed, taking care not to deflate the batter too much. The chocolate should dot the batter generously but not overwhelm it.
Pouring, decorating, and baking
I pour the batter into the prepared loaf pan and smooth the top with a spatula. If I want a bakery‑style look, I lay a line of banana slices down the center or scatter them across the top, and sometimes I warm a little peanut butter and drizzle it over in a zigzag pattern. Those extra touches create a gorgeous top crust that looks just like a specialty bakery loaf.
The loaf bakes in the preheated oven for about 55–70 minutes, depending on your oven and pan. I start checking around the 50‑minute mark by inserting a toothpick into the center; it should come out with just a few moist crumbs attached, not wet batter. If the top starts to brown too quickly while the center is still underdone, I lightly tent the loaf with foil and continue baking until it’s fully set.
Once baked, I let the loaf cool in the pan for about 10–15 minutes, then carefully lift it out (using the parchment if I lined the pan) and transfer it to a wire rack to cool completely. This cooling time is important—cutting too early can cause the bread to crumble, and letting it rest allows the crumb to set and the flavors to deepen.
Continue to the next page to reveal more tips and tricks