
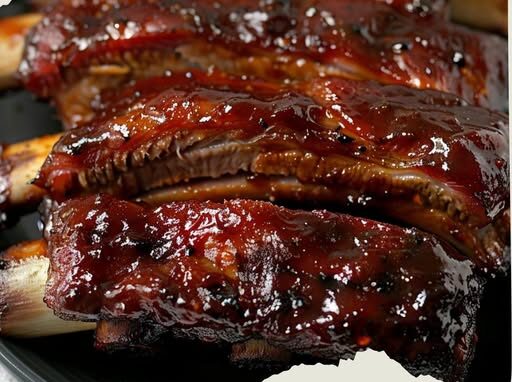
Dr Pepper ribs are one of my favorite ways to turn a simple tray of country‑style pork ribs into a rich, sticky, fall‑apart meal that tastes like it came from a slow‑smoke barbecue joint. I love how Dr Pepper brings a caramel sweetness, a hint of cherry, and gentle spice, then melts into the BBQ sauce to create a glossy glaze that clings to every edge of the meat. When these ribs come out of the oven, the sauce is bubbling, the meat is tender, and it’s almost impossible not to sneak a bite before they hit the table.
I reach for this recipe whenever I want big flavor with minimal fuss. Country‑style pork ribs are meaty, forgiving, and budget‑friendly, so they’re perfect for slow cooking in a bath of Dr Pepper until the meat is tender enough to pull apart with a fork. The soda does double duty: it helps break down the fibers in the ribs while adding layers of flavor, and then it reduces into a sticky glaze with BBQ sauce and liquid smoke. The end result is a pan of ribs that look impressive, taste incredible, and easily become the star of any casual dinner, game day spread, or weekend cookout.
These Dr Pepper ribs also fit naturally into real life. I can get them into the oven early, let them slowly braise while I handle other things, and then finish them under the broiler or on the grill right before serving. That schedule makes entertaining so much easier, and it means dinner can feel special even on a busy day. Leftovers (if I’m lucky enough to have any) make amazing sandwiches, sliders, or loaded baked potatoes, so this one recipe can carry us through more than one meal without feeling repetitive.
Why I Love These Dr Pepper Ribs
Flavor and Texture You Get
What pulls me back to Dr Pepper ribs again and again is the combination of deep flavor and tender texture. The soda adds more than just sweetness—it carries notes of caramel, vanilla, and spice that blend beautifully with smoky BBQ sauce. As the liquid slowly cooks with the ribs, it soaks into the meat and creates a savory‑sweet profile that feels complex even though the ingredient list is short. The final glaze, thickened and slightly sticky, gives you that perfect tug when you bite into a rib, followed by a juicy, almost buttery mouthfeel.
Texture‑wise, these ribs walk the line between “fall‑off‑the‑bone” tender and still satisfying to bite. Because the ribs braise covered first and then finish uncovered with glaze, they stay moist inside while the outside edges pick up a gentle chew and char. That contrast makes every bite interesting, especially when you drag the rib through any extra sauce that drips into the pan.
When I Make This Recipe
I tend to make Dr Pepper ribs when I want something fun and a little indulgent but don’t feel like hovering over a grill for hours. They’re perfect for:
- Game days and watch parties.
- Casual weekend dinners where you want a “wow” main dish.
- Potlucks or family gatherings where you can bring a pan and let people help themselves.
Because the recipe scales easily, I can cook one pan for a small family dinner or double it for a crowd just by adding more ribs and using a larger roasting pan.
Dr Pepper Ribs Ingredients
Main Ingredients Breakdown
- 4.5 lbs country‑style pork ribs – These ribs have plenty of meat and enough marbling to stay juicy during a long, slow cook. They’re easier to work with than long racks and perfect for braising.
- 2 (12 oz) cans Dr Pepper soda, divided – One can goes into the pan as braising liquid, and the second cooks down into the glaze. The soda contributes sweetness, caramel notes, and subtle cherry‑vanilla flavor.
- ¾ cup BBQ sauce – Use your favorite brand or homemade sauce. A slightly smoky, tangy sauce balances the sweetness of the Dr Pepper really well.
- 2 teaspoons liquid smoke – Just a small amount adds that backyard‑smoker depth, even if you’re cooking entirely in the oven.
Optional Seasonings and Rub Ideas
To build even more flavor, I like to season the ribs before they ever see the Dr Pepper. Here are simple additions that work beautifully:
- Salt and black pepper (a must for bringing out the meat’s flavor).
- Garlic powder and onion powder for savory backbone.
- Smoked paprika or chili powder to echo the smoky glaze.
- A spoonful of brown sugar in the rub if you love an extra caramelized crust.
You can keep it very simple with just salt and pepper or go full rub; Dr Pepper is flexible enough to play nicely with both approaches.
How to Make Dr Pepper Ribs
Prepping and Seasoning the Ribs
I start by patting the country‑style pork ribs dry with paper towels. This step helps the seasoning stick and encourages better browning. Then I season all sides generously with salt and pepper, plus any optional rub ingredients I’m using. At this point, you can let the ribs sit for 15–30 minutes while you preheat the oven to 300–325°F (150–165°C). That short rest lets the seasoning begin to penetrate the surface of the meat.
Next, I arrange the ribs in a single layer in a large baking dish or roasting pan. If there’s a lot of fat on one side, I like to place that side facing up so it melts and bastes the meat during cooking. A heavy pan with higher sides works best because it will hold the braising liquid and prevent spills.
Braising the Ribs in Dr Pepper
Once the ribs are arranged, I crack open the first can of Dr Pepper and pour it slowly around and over the meat. I want enough liquid to come up the sides of the ribs but not completely submerge them; the tops can sit above the liquid. Then I cover the pan tightly with heavy‑duty foil. This seal is important—it traps moisture and helps the ribs braise gently, allowing the Dr Pepper to work its tenderizing magic.
The covered ribs go into the preheated oven and cook low and slow for about 2 to 2½ hours, depending on the thickness of the ribs. I usually check them around the 2‑hour mark by carefully peeling back the foil and testing a piece with a fork. If the meat yields easily and looks juicy, they’re ready for the glazing step. If they still feel a bit firm, I reseal the pan and give them another 20–30 minutes.
Making the Dr Pepper BBQ Glaze
While the ribs braise, I turn to the glaze. In a medium saucepan, I combine the second can of Dr Pepper, the ¾ cup of BBQ sauce, and the 2 teaspoons of liquid smoke. If I’m in the mood for extra sweetness or spice, I might add a tablespoon of brown sugar or a dash of hot sauce, but that’s completely optional.
I bring this mixture to a simmer over medium heat, stirring occasionally so it doesn’t scorch at the bottom of the pan. Once it starts to bubble, I lower the heat slightly and let it reduce. Over 15–20 minutes, the sauce thickens and darkens; I know it’s ready when it coats the back of a spoon and leaves a line when I run my finger through it. Reducing the mixture concentrates both the Dr Pepper and the BBQ sauce, creating a glaze that clings beautifully to the ribs instead of running off.
Glazing and Finishing in Oven or on Grill
When the ribs are tender, I remove the pan from the oven and carefully pour off most of the cooking liquid, leaving just a thin layer to keep the bottom from scorching. Then I liberally brush the prepared Dr Pepper BBQ glaze over every surface of the ribs. I don’t hold back here; this is where the recipe really comes alive.
To finish the ribs in the oven, I increase the temperature to about 400°F (200°C) or switch on the broiler. The ribs go back in, uncovered, for 8–12 minutes, depending on how caramelized I want them. During this time, I sometimes brush on another layer of glaze halfway through to build up a sticky coating. Under the broiler, the sugars in the sauce bubble, the edges char slightly, and the scent filling the kitchen is pure barbecue comfort.
If I’m finishing on the grill instead, I preheat it to medium‑high, oil the grates lightly, and transfer the ribs directly onto the hot grill. Then I baste them with more glaze as they cook for about 5–10 minutes, turning once or twice, just long enough to pick up grill marks and a little smoky char. Any extra glaze in the pan can be drizzled over the ribs right before serving.
Continue to the next page to reveal more tips and tricks