
For the vanilla fudge base
- 450 grams white chocolate chips or chopped bar
- 397 grams sweetened condensed milk (standard 14 oz can)
- 1 teaspoon vanilla extract
- A pinch of fine sea salt
Many orange creamsicle fudge recipes rely on white chocolate plus sweetened condensed milk as the main structure for a soft, creamy bite. Vanilla and a touch of salt round out the flavor and keep the sweetness from tasting flat.
For the orange swirl
- 170 grams white chocolate chips or chopped bar
- 1/3 cup sweetened condensed milk
- 2–3 teaspoons orange extract (for a strong creamsicle flavor)
- Orange gel food coloring (optional, for a more vivid hue)
Orange extract provides the concentrated citrus note typical of creamsicle fudge. Gel food coloring is often recommended over liquid for orange fudge because it gives vibrant color without thinning the mixture.
Step-by-step instructions
1. Prepare the pan
Line an 8×8-inch square baking pan with parchment paper, leaving some overhang on two opposite sides to create a sling. This overhang makes it easy to lift the set fudge out for slicing, a technique used in many fudge recipes.
2. Create the vanilla base
In a medium, heavy-bottomed saucepan, combine 450 g white chocolate and the 397 g can of sweetened condensed milk. Place the pan over the lowest possible heat.
Stir constantly with a silicone spatula or wooden spoon as the chocolate begins to melt. Heavy-bottomed pans and low heat are commonly recommended to prevent scorching and graininess when working with white chocolate fudge. Continue stirring until the mixture is completely melted, smooth, glossy, and uniform, about 5–7 minutes. Do not let it simmer or boil.
Remove the saucepan from the heat. Quickly stir in the vanilla extract and a pinch of fine sea salt until fully incorporated. This step mirrors other white-chocolate fudge recipes that finish off heat with flavorings to avoid evaporating delicate aromas.
Pour about two-thirds of this vanilla fudge mixture into the prepared pan. Use an offset spatula or the back of a spoon to spread it into an even or semi-even layer. Leave the remaining one-third of the vanilla mixture in the warm pan so it stays soft while you prepare the orange layer.
3. Make the orange layer
In a separate small microwave-safe bowl, combine 170 g white chocolate and 1/3 cup sweetened condensed milk. Microwave in 20-second bursts, stirring well after each interval, until the mixture is melted and smooth. Using short bursts and stirring in between is standard advice for microwave fudge to avoid hot spots and burning.
Alternatively, you can melt this mixture in a small saucepan over very low heat, stirring constantly, just as you did for the base.
Once melted and smooth, stir in 2–3 teaspoons orange extract, tasting after 2 teaspoons and adding more if you want a stronger orange punch. Many orange fudge recipes use around 1–3 teaspoons of orange extract depending on batch size and desired intensity. If using, add a few drops of orange gel food coloring and mix until the color is even and vibrant.
4. Swirl and combine
Pour all of the orange mixture over the vanilla layer in the pan, spreading it gently so it mostly covers the surface. Then spoon or dollop the reserved vanilla fudge mixture randomly over the top of the orange layer.
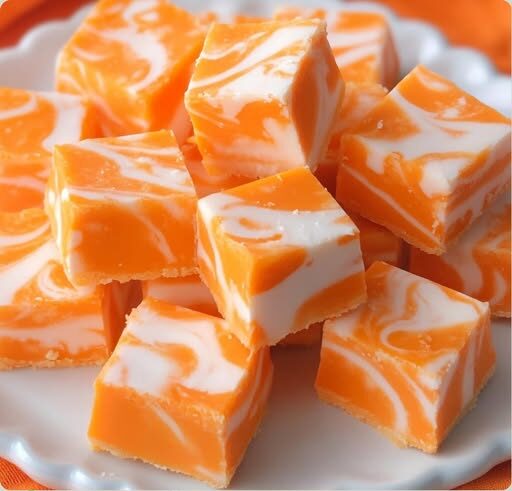
Using a butter knife, skewer, or thin offset spatula, gently swirl the two mixtures together in a figure-eight pattern. Draw the tool through both layers, occasionally dipping deeper to pull some vanilla up through the orange and vice versa, creating a marbled effect. Avoid overmixing; most swirl fudge recipes emphasize stopping as soon as you see defined ribbons so you don’t end up with a single blended color.
5. Set the fudge
Let the pan sit at room temperature for about 30 minutes to cool slightly. Then cover and transfer to the refrigerator. Chill for at least 4 hours, or until the fudge is completely firm to the touch and holds its shape when gently pressed. Many similar fudge recipes suggest a chilling time of 2–4 hours or overnight for the cleanest slices.
6. Slice and serve
Once firm, use the parchment sling to lift the entire block of fudge out of the pan and onto a cutting board. With a large, sharp knife, cut into 1-inch squares (or larger if you prefer). For neat, clean edges, wipe the knife with a hot, damp cloth between cuts, a standard slicing tip in fudge recipes.
Store the fudge squares in an airtight container in the refrigerator. They keep well for at least a week, similar to other condensed-milk-based fudges. For gift boxes or dessert platters, you can bring the fudge to cool room temperature before serving; the texture will be slightly softer and creamier.